New Apple ID : This can be used to access Apple’s services (such as App Store, iTunes Store). Want to use Apple services or log in to a Apple device? Let’s register a new ID immediately~

New Apple ID
This ID (account) not only can be used on Apple devices, but also on Apple services.
- Apple – official website
If you don’t know how to open a new ID, just follow our steps.
In this article, we will introduce how to sign up a new Apple account, let’s get it.
- ID
- Step
Apple ID Creation
ID 0 official website
To sign up a new account?
You can apply for it through different Apple platforms (such as websites, Apps, or devices).
We recommend registering on the web, it’s easier and faster.
Official website : Apple ID
First, we open the Apple ID official website link.
After entering, click Create your Apple ID.
You could refer to the images and instructions below for different version of websites.
ID 1 desktop site
▼ Readers on desktop site, click Create your Apple ID at the top.
(Then continue to follow the step section)

ID 2 Mobile site
For Readers who use mobile site.
If you are on an Apple device, it might detect your existing account automatically.
When the login appears, tap Cancel. If you are already logged in, tap Logout.
▼ Then tap V at the upper right corner to open the menu.
Select Create your Apple ID.
( Continue to see steps below)

Apple ID Tutorial
(We use iPhone/Safari browser/mobile site to register)
Step 1 Country/Region
▼ Enter the registration page, first select your Country/Region.
For example, select United States.
Then enter your First name, Last name, and Birthday.
For the email part, please fill in an email addresses that is valid.
This email needs to be verified later, and will be your new Apple ID.
Note: You can’t use the same e-mail addresses on different Apple IDs.

Step 2 Form
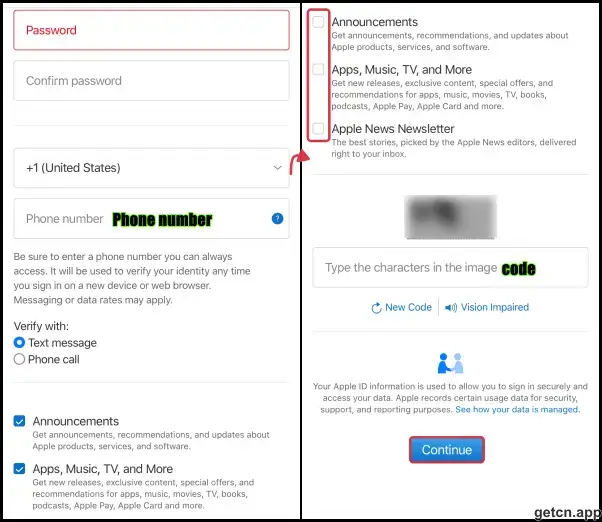
▼ Then enter Password and Confirm password.
Select Country code and enter your Phone Number, it needs to be verified as well.
The verification method is optional (we verified with Text message as below).
You could uncheck Announcements, Apps… and Apple News options, and you won’t receive related messages.
Next, fill in the image verification code.
Confirm the content above is correct again.
If you agree to Apple’s terms of service, tap Continue.

Step 3 Verify Email
▼ Open your mailbox to receive the verification letter.
Enter the verification code and tap Next.

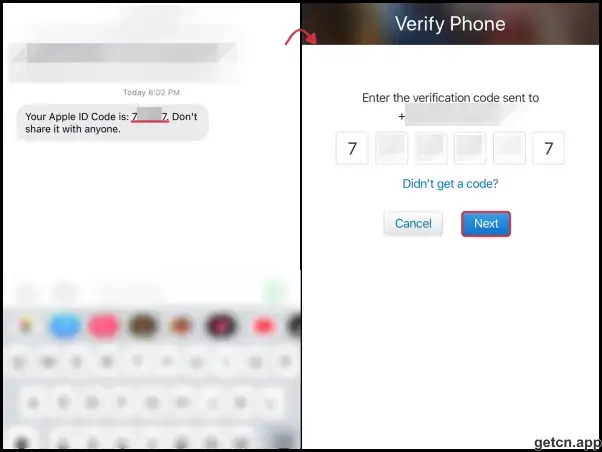
Step 4 Verify Phone I
▼ After passing the email verification, you’ll need to verify phone number.
Get the SMS verification code, enter the code, and tap Next.

Step 4 Verify Phone II
▼ Didn’t receive it? Try to click Didn’t get a code?
You can select Resend Text, call Me or Use a Different Number.

Step 5 Confirm
▼ After the phone verification, your new ID has been created.
Your account will be automatically logged in.
And you can tap V (at the top), select Personal Information to view your information.

We need a ID to use the Apple services or devices, and this post is how we do it. Hope these can get you one, if you have any problem or suggestions, feel free to let us know below, Thanks.
